なんで今までやらなかったんだろう。結論からすると素晴らしい!
今までご紹介したMinioは、あくまでもシングルテナント単体の話だったが、このMinio Operatorは、マルチテナントダッシュボードでテナントの作成削除ができてしまう。Kubernetesがあれば、あなたもS3互換サービスのサービスプロバイダーに!
閑話休題
試した環境
- Kubernetes v1.22.9 (v1.19以上が必要)
- Loadbalancer (自分Metallbを利用)が動作している
- Storage Classが正しく動作している。
- krewがインストールされている端末
- テナント作成時に気をつければ、シングルノードでも動作する。
多分、パブリッククラウドでk8sを作れば普通に動く。ただ、パブリッククラウドでわざわざ作る必要はないと思う。パブリッククラウドには普通にオブジェクトストレージがあるし、絶対そっちのほうが安い。
オンプレで作りたい場合は、以下を利用すると簡単にイチから作成できる。(シングルノードだが。)
https://github.com/masezou/k8s-study-vanilla
Minio Operatorのインストール
krewのプラグインをインストールする。
tmase@ent8-client:~$ kubectl krew install minio
Updated the local copy of plugin index.
Installing plugin: minio
Installed plugin: minio
\
| Use this plugin:
| kubectl minio
| Documentation:
| https://github.com/minio/operator/tree/master/kubectl-minio
| Caveats:
| \
| | * For resources that are not in default namespace, currently you must
| | specify -n/--namespace explicitly (the current namespace setting is not
| | yet used).
| /
/
WARNING: You installed plugin "minio" from the krew-index plugin repository.
These plugins are not audited for security by the Krew maintainers.
Run them at your own risk.
Minio Operatorの構築
オプションは以下にあるのだが、オプションはなし。
https://docs.min.io/minio/k8s/reference/minio-kubectl-plugin.html
tmase@ent8-client:~$ kubectl minio init
namespace/minio-operator created
serviceaccount/minio-operator created
clusterrole.rbac.authorization.k8s.io/minio-operator-role created
clusterrolebinding.rbac.authorization.k8s.io/minio-operator-binding created
customresourcedefinition.apiextensions.k8s.io/tenants.minio.min.io created
service/operator created
deployment.apps/minio-operator created
serviceaccount/console-sa created
clusterrole.rbac.authorization.k8s.io/console-sa-role created
clusterrolebinding.rbac.authorization.k8s.io/console-sa-binding created
configmap/console-env created
service/console created
deployment.apps/console created
-----------------


To open Operator UI, start a port forward using this command:


kubectl minio proxy -n minio-operator


-----------------
作成の確認
tmase@ent8-client:~$ kubectl -n minio-operator get all
NAME READY STATUS RESTARTS AGE
pod/console-5f4f574656-2q5dq 1/1 Running 0 83s
pod/minio-operator-5b78bffd5c-g6r9b 0/1 Pending 0 83s
pod/minio-operator-5b78bffd5c-jnw65 1/1 Running 0 83s


NAME TYPE CLUSTER-IP EXTERNAL-IP PORT(S) AGE
service/console ClusterIP 10.111.232.248 <none> 9090/TCP,9443/TCP 83s
service/operator ClusterIP 10.101.122.37 <none> 4222/TCP,4221/TCP 83s


NAME READY UP-TO-DATE AVAILABLE AGE
deployment.apps/console 1/1 1 1 83s
deployment.apps/minio-operator 1/2 2 1 83s


NAME DESIRED CURRENT READY AGE
replicaset.apps/console-5f4f574656 1 1 1 83s
replicaset.apps/minio-operator-5b78bffd5c 2 2 1 83s
Minio Operatorへのアクセス
tmase@ent8-client:~$ kubectl minio proxy -n minio-operator
Starting port forward of the Console UI.


To connect open a browser and go to http://localhost:9090


Current JWT to login: hogehogehogehoge
ブラウザでhttp://localhost:9090アクセスとしたいんだが、リモートの環境でconfigもってくるのがめんどくさいので一時的にMinio OperatorのコンソールをClusterIP →LoadBalancerに書き換える
tmase@ent8-client:~$ kubectl -n minio-operator patch service console -p '{"spec":{"type": "LoadBalancer"}}'

tmase@ent8-client:~$ kubectl -n minio-operator get svc console
NAME TYPE CLUSTER-IP EXTERNAL-IP PORT(S) AGE
console LoadBalancer 10.111.232.248 192.168.18.20 9090:30991/TCP,9443:30868/TCP 10m
External IPきたー!JWTのログインは以下で参照可能
tmase@ent8-client:~$ kubectl -n minio-operator get secrets
NAME TYPE DATA AGE
console-sa-token-4nqcc kubernetes.io/service-account-token 3 33m
default-token-gtj7g kubernetes.io/service-account-token 3 33m
minio-operator-token-bpczr kubernetes.io/service-account-token 3 33m
operator-tls Opaque 2 33m
tmase@ent8-client:~$ kubectl -n minio-operator describe secrets console-sa-token-4nqcc
Name: console-sa-token-4nqcc
Namespace: minio-operator
Labels: <none>
Annotations: kubernetes.io/service-account.name: console-sa
kubernetes.io/service-account.uid: cb7d4876-2a35-41ce-9fd7-9d31e2fd0ebe


Type: kubernetes.io/service-account-token


Data
====
ca.crt: 1099 bytes
namespace: 14 bytes
token:
hogehogehogehoge
Minio Operatorに ブラウザでアクセス(Safariだと一部の設定ができないのでChromeがいい)
http://192.168.18.20:9090/login

ログイン後の画面

テナントの作成
早速テナントを作ってみる
以下のようにパラメータを入れる。Namespaceは作るかと聞いてくる。
シングルノードの場合はServer を必ず1にする。また、ドライブ数は4以上にしておく。
容量などの計算結果が表示されるという親切設計!

追記部分
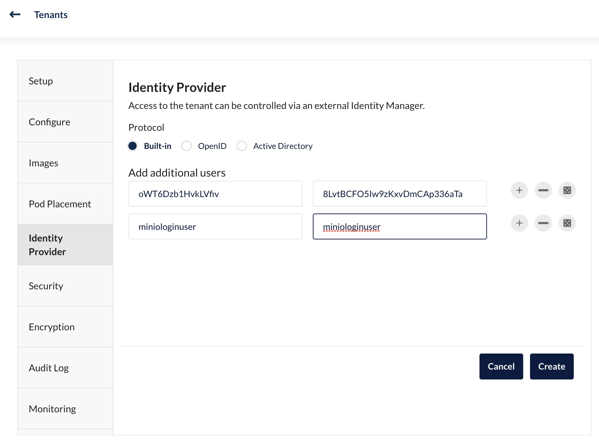
Built-inのクレデンシャルも設定可能

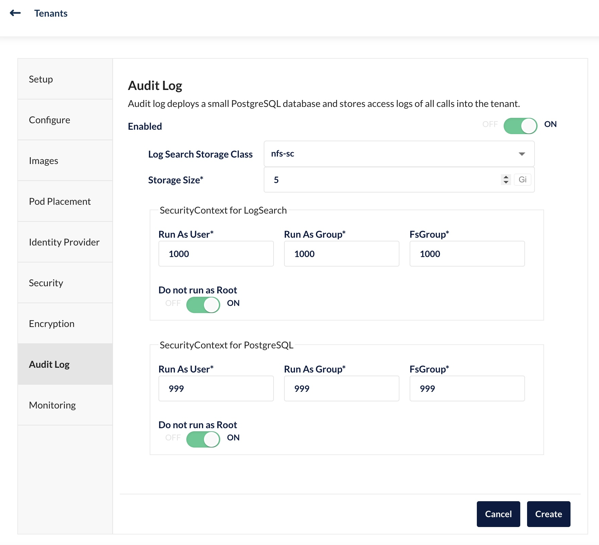
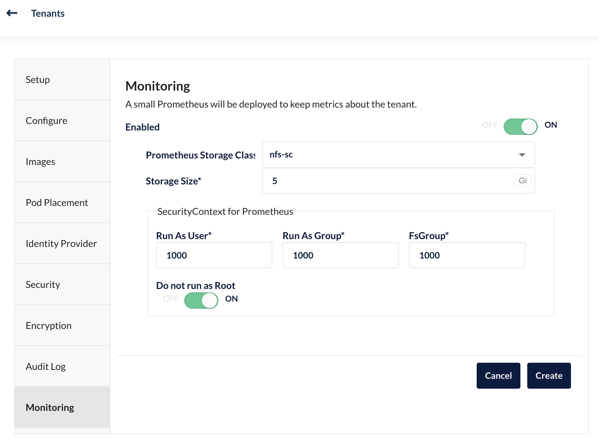
LoggingとPrometheusのストレージクラスも設定しておく。


テナント作成すると、Access KeyとSecret Key が表示される。ただし、再度表示不可なので、必ずメモをするか、Download for importをクリックしてダウンロードしておく。

テナント作成完了

コンソールの接続方法とEndpointの方法が表示される。

以下で、GUIなしでもテナントが作れるのだが、PrometheusやLoggingの構成がされず、LoadBalancerが付かないのでGUIでテナントを作ることをお勧めする。
kubectl create ns minio-tenant-1
kubectl minio tenant create minio-tenant-1 \
–servers 1 \
–volumes 4 \
–capacity 4Gi \
–namespace minio-tenant-2 \
–storage-class nfs-sc
これでサービスプロバイダー部分の操作は完了!
テナントユーザアクセス
ブラウザで https://192.168.18.22:9443 にアクセス。EndpointのURLにアクセスしても何も表示されない。(ちょっとしたわけがあるのだが、気にしない。)
いつものMinioへアクセスできた。

なんとPrometheusも実装ずみ。

さらにAuditlogまで実装ずみ。おったまげー

テナント作成でできたもの(以下、vSphere-scにLoggingとPrometheusができてしまった。後で再構築して直した。)
tmase@ent8-client:~$ kubectl -n minio-test01 get all
NAME READY STATUS RESTARTS AGE
pod/minio-test01-log-0 1/1 Running 0 20m
pod/minio-test01-log-search-api-f9c5b6d6-js7x6 1/1 Running 3 (20m ago) 20m
pod/minio-test01-pool-0-0 1/1 Running 0 20m
pod/minio-test01-prometheus-0 2/2 Running 0 19m


NAME TYPE CLUSTER-IP EXTERNAL-IP PORT(S) AGE
service/minio LoadBalancer 10.99.15.115 192.168.18.21 443:30640/TCP 20m
service/minio-test01-console LoadBalancer 10.101.123.217 192.168.18.22 9443:30719/TCP 20m
service/minio-test01-hl ClusterIP None <none> 9000/TCP 20m
service/minio-test01-log-hl-svc ClusterIP None <none> 5432/TCP 20m
service/minio-test01-log-search-api ClusterIP 10.96.64.179 <none> 8080/TCP 20m
service/minio-test01-prometheus-hl-svc ClusterIP None <none> 9090/TCP 19m


NAME READY UP-TO-DATE AVAILABLE AGE
deployment.apps/minio-test01-log-search-api 1/1 1 1 20m


NAME DESIRED CURRENT READY AGE
replicaset.apps/minio-test01-log-search-api-f9c5b6d6 1 1 1 20m


NAME READY AGE
statefulset.apps/minio-test01-log 1/1 20m
statefulset.apps/minio-test01-pool-0 1/1 20m
statefulset.apps/minio-test01-prometheus 1/1 19m
tmase@ent8-client:~$ kubectl -n minio-test01 get pvc
NAME STATUS VOLUME CAPACITY ACCESS MODES STORAGECLASS AGE
data0-minio-test01-pool-0-0 Bound pvc-c3f00687-ad37-4a24-9197-4da76d53c599 53687091200 RWO nfs-sc 20m
data1-minio-test01-pool-0-0 Bound pvc-63551ac8-3eb4-46f7-b5c2-c26fa6ade793 53687091200 RWO nfs-sc 20m
data2-minio-test01-pool-0-0 Bound pvc-d58d0829-43ee-4a97-9f37-762057480e56 53687091200 RWO nfs-sc 20m
data3-minio-test01-pool-0-0 Bound pvc-49d5fd7d-3d59-4e1a-8681-1243d64443d8 53687091200 RWO nfs-sc 20m
minio-test01-log-minio-test01-log-0 Bound pvc-1b893e07-753c-4602-b548-cd2316000adc 5Gi RWO vsphere-sc 20m
minio-test01-prometheus-minio-test01-prometheus-0 Bound pvc-e0f530e5-1bae-4eb0-aed3-9ce3e2c04d6a 5Gi RWO vsphere-sc 19m
mcコマンドでAPIアクセス
証明書を食べていないので–insecureオプションがいる。ここで指定するURLは、Endpointのもの。
tmase@ent8-client:~$ mc --insecure alias set minio-tenant https://192.168.18.21 <Access Key> <Secret Key> --api S3v4
tmase@ent8-client:~$ mc --insecure admin info minio-tenant
● 192.168.18.21
Uptime: 28 minutes
Version: 2022-04-16T04:26:02Z
Network: 1/1 OK
Drives: 4/4 OK
Pool: 1st


0 B Used, 0 Buckets, 0 Objects
4 drives online, 0 drives offline
ばっちりですなぁ。ここまでの出来だと、どこかに買収されそう。
minioに関しては、systemctl起動やら、docker/docker-composeで起動するためのスクリプトを作ってきたが。。。これでいいじゃん!少なくとも、docker-composeで動作するものとMinio Operatorがあればもう何もいらない。
ここまでminioを追っかけてますが、自分はminioの人でもなく、1ミリもminioとは関係ありません。